

Guide to installing Wall System 1
Installing Wall System 1 provides soundproofing for domestic party walls and forms an acoustic barrier to be used as an internal lining to improve the sound insulation of existing walls.
Wall preparation
Before installing the new acoustic wall, you should remove all wall decorations, skirting boards, coving and picture rails and electrical outlets. Extend the electrical cable as required to reinstate the electrics once the work is complete.
Installing Wall System 1
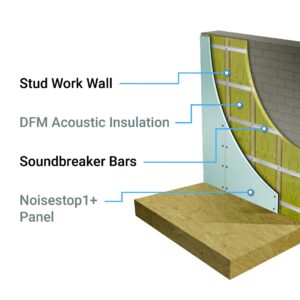
Install Wall System 1 onto a stud frame. The framework can be a timber metal frame. Try to avoid mechanical fixing into the party wall. You will reduce the chance of sound transfer through the wall if you don’t fit into the existing wall. Fix the stud frame to the floor and ceiling and into the return walls to secure the wall.
You should isolate the stud frame with the Noisestop Isolation Strips around the perimeter of the stud frame.
It is vital to ensure the depth of the stud frame is equal too, or deeper than the thickness of the acoustic insulation. Acoustic insulation slabs will not compress. If you try to compress the slabs too much, the plasterboard will eventually move and crack along the edges of the boards.
NOTE: Leave a small gap if possible of at least 10mm between the existing wall and the new stud frame; this will further reduce sound transfer between the two walls.
Step 1.
Insulating the stud frame
Infill the stud frame with DFM acoustic insulation. Fill the cavity with acoustic insulation with no gaps between the insulation and the stud work.
You can cut acoustic insulation with a hand saw or an old bread knife. Measure the opening between the studs and cut the insulation approximately 5mm wider. Cutting the slabs wider than the opening will mean the slabs will friction fit between the studs. You shouldn’t need to use fixing to hold the slabs in place; if necessary, you can fasten a screw or nail into the side of the stud to hold the insulation in place.
Step 2.
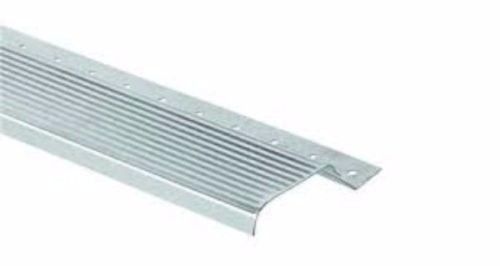
Fixing Soundbreaker bars
Fasten the Soundbreaker bars perpendicular to the stud frame.
NOTE: The bars have a pre-drilled edge with holes running along the entire length of the bar. This section should always be at the bottom of the bar. The wider corrugated part of the bar should be facing into the room.
Screw the bars straight into the stud frame using the pre-drilled holes as the pilot hole. Fasten the first bar 50mm from the floor up the wall. Fix the bars into each stud along the entire length of the bar. The bars are 3m long; if your wall is longer than 3m, you should overlap the bars by 100mm to extend them. Space the bars at 600mm centres. Measure from the floor and fix a bar, in the same way, all the way up the wall. A soundbreaker bar should be installed 50mm from the bottom of the wall and 50mm from the top.
Step 3.
Fitting the soundproof panels
NOTE: Fit the boards with the blue face of the acoustic plasterboard facing into the room—the mass-loaded barrier mat on the back of the board into the wall.
The soundproof panels are fastened to the soundbreaker bars using drywall or universal screws. You can not nail into the bars. You will not need to drill the boards before you attach them. Screw straight through the panel into the wide corrugated flange of the bar. You should be able to use 15 screws per full-size panel 1200mm x 1200mm. Fasten into the three bars behind the boards with five screws per bar. Do not over tighten the screws. They should be flush or just below the surface of the plasterboard face.
When you reach the edges of the wall, you will need to cut the soundproof boards. Cut the boards with a Stanley knife, hand saw circular saws, or a jigsaw.
It is essential to ensure that every edge of the panels is well fitted and sealed. Do not leave gaps between the boards; ensure they are butted together. Use AC50 acoustic sealant along the edges of each panel as you install them. Once you’ve fitted the first board, run a bead of the acoustic sealant along the edge and then install the next. Once all the panels have been fitted check the wall making sure you fill small gaps with the acoustic sealant.
Step 4.
Finishing you wall
All our soundproof panels are manufactured using a 12.5mm acoustic plasterboard with tapered edges; you can finish the boards in two different ways. You can plaster skim straight onto the face of the panels using multi skim thin coat plaster. Alternatively, you can also tape the tapered edge of the panel, fil and sand them before decorating.
Reinstate your wall furniture as necessary. You can reinstate electrical points back into the wall. To avoid cutting out sections of the wall, we would recommend surface mounted sockets. If you are using recessed back boxes, use the acoustic putty pads to ensure the soundproofing integrity of the wall.
For assistance with any of the products or how to install them properly, please give us a call, 01423 339163
Related Products
-
Soundbreaker Bar Acoustic Hanger 3m
From £ 4.95 ex. VAT -

Noisestop 1 Plus Panel 18mm x 1200mm x 1200mm
From £ 29.95 ex. VAT -

Wall System 1 Party Wall 83mm Soundproofing Kit
From £ 195.31 ex. VAT